November's host code is 4RZSNFS3

Friday, February 4, 2022

Completing Paper Pumpkin Kits - Goal #2

Do you love Paper Pumpkin kits?  

Me too!

One of the things I love about the kits, is that you can make so many different ways to complete the contents.  Most of the kits are created to make cards, while others are created to make boxes or treat holders.  What is special about the kits is that you can use the kit parts to create just about anything you'd like.  There are many alternatives found on Pinterest.  I appreciate the creators of the alternatives and often CASE them with my little twist added.  

Another reason I love the kits, is that if you con't finish making all the cards, you can always use an older kit to make some great NEW cards.  Many of the card stock colors coordinate or match the kit pieces so the updated products can be used to create new looks.

While cleaning up my crafting room, I noticed that I had several Paper Pumpkin kits on my shelves. So as one of my New Year's goals, besides continuing to purchase more kits, I started with the December 2020 Beary Comforting kit and the topic of Valentine's Day.  Below is my finished card.  This was so much fun, so I decided to continue with the February 2018 kit. 


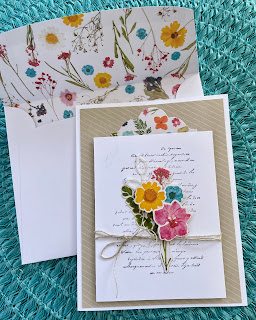
Using the Wildflower Wishes kit became my next project. The inside of the kit envelope was my inspiration for using the beautiful flowers included in the kit. And, a card I spied on Pinterest had a word stamp for the background.  So, I added the VERY VERSAILLES  (#149275). stamp set from the 2021-2022 Annual Catalog as the base for the kit flowers. 

To soften the verse, I stamped off before stamping with Black ink on the Basic White card stock.  Doesn't it allow the flowers to stand out and give the entire card a unified look?  I wrapped the thread provided in the kit around the card and tied a bow.  

On the card shown below, I used the negative from the die cut word included in the kit.  Cutting it into two pieces allowed me to add them at the top and bottom of the stamped card.  They highlighted the separation of the two Basic White layers.


On the card below, I cut the flower die piece which was included in the kit and placed it at the top of the stamped card. I cut the base card included in the kit to make the mat.  This made the flowers on the card become a focal point.  And again I added the thread for texture. 

Both cards used the pieces of the kit, but by adding a stamped background and cutting the enclosed paper pieces, the cards each have a different finished look. 

The new Paper Pumpkin kit for this month is a playful, party-themed kit which includes all the goodies and gear you need to create nine cards and coordinating envelopes in safari-inspired shapes and patterns you’ll go wild for! 


This month's kit has amusing animals, beautiful botanicals, and celebratory sentiments.  To order this new kit, click on the link to the right.  And if you decide to place a multiple month subscription during the month of February 2022, you may qualify for one or more Sale-a-Bration Free items.  A 3-month subscription would qualify for one Free SAB item!  And remember, you can always place your subscription on "hold".  So, if you want to wait to receive the first kit, or to choose the kit each month, you can simply go on the Paper Pumpkin website and place a "hold" on delivery of the month's kit. If you'd like more information on how Paper Pumpkin works, leave a comment below, and I'll contact you. 

If you grab an older Paper Pumpkin kit and finish it, please let me know!  Just add the information in the comment section below.  

As always, I appreciate all your comments on my cards and blog.

Keep having fun and keep creating!

Janice


Wednesday, January 26, 2022

Designer Series Paper Cards - February 2022

 Brrrr...it's cold here in Florida!  I know some of you will giggle when I talk about cold in Florida...afterall, you may be 40 degrees or more colder than I am.  It's 55 degrees here now, but was in the 30's yesterday morning.  And for Florida, THAT'S COLD!  I can't remember when was the last time I was in my house wearing a sweater and long pants.  My husband is cold all the time so he likes the temperature in the high 70's in the house.  And I am so hot, I follow behind him and lower it to 68 degrees.  Our a/c unit probably thinks we're crazy!  Bottom line, it's cold everywhere in the U.S. this week.

And what's better than playing inside with your Stampin' Up!® products during the cold weather?  

As I love Stampin' Up! Designer Papers (DSP), I've been playing with some of the paper from the 2022 JJ Mini Catalog.  Below is an example of a very simple card using the Flowering Fields DSP.  I don't even have a sentiment on it as I don't want to hide the beautiful paper.  I did add a little ribbon for texture.  Aren't the colors on the paper gorgeous?


And I couldn't stop there.  After all, with the beautiful FREE Designer Paper on my table, how could I not make more cards?  So using the Friendly Hello Designer paper, here are two more cards using the same design as above.  Don't they appear so different from the one above?  


The cutting sizes are the same for all three cards:

Card base folded horizontal    5 1/2 in. x 4 1/4 in. (half 11 x 8 1/2 cardstock)
Basic White cardstock mat      5 1/4 in. x 4 in.
Color cardstock mat                5 in. x 3 3/4 in.
3 strips                                     3 in. x 1 3/4 in.
 
NOTE:  As a suggestion, layout the strips focusing on animals (like the bird) and the direction of any designs (like the flowers)

One of the benefits of Stampin' Up! products is the way everything coordinates.  Have fun selecting your favorite Designer Paper and coordinating card stock and ribbon.  So simple, so beautiful.

And stay warm.

-- Janice


Friday, January 21, 2022

Sale-a-Bration January - February 2022: FREE KIT #1

 SALE-A-BRATION has begun!

Twice a year, Stampin' Up! introduces a "mini" catalog.  The catalog supplements the Annual Catalog by offering new stamp sets, dies, and Designer Series Paper (DSP).  And a smaller Sale-a-Bration (SAB) brochure showcasing items that you can receive FREE based on the dollar amount of your purchase is sent.  You earn the free SAB items by making a purchase of $50 and multiples of $50 of any Stampin' Up! products.  These special products are only available while supplies last during the two month Sale-a-Bration time.

I have created kits which use some of the free SAB items to thank you for your orders.  These free kits are for my customers who receive SAB items earned by placing orders through my January Hostess Code (shown above).  You do not need to select the SAB Free item used in the kit to receive that kit.  

The first kit includes the cardstock and DSP needed to create the card below.  The DSP papers are from the Sunshine and Rainbows 6x6 DSP package.  The kits cannot contain any stamped image, as Stampin' Up! does not permit demonstrators to supply them.  You will receive enough materials to create 3 cards and you can use any sentiment you already have!


So not only do you receive the Free gift from Stampin' Up!, but also a free card kit from Me!

Check back on this blog, to see what the next kit will contain.  Please understand that the supply of the DSP for the card kits is limited.  So please place your order soon,.  I'll send your card kit shortly after you place your order.

Be watching for my next blog post that will show another Free Kit for ordering during Sale-a-Bration.  

-- Janice

Tuesday, January 18, 2022

No Resolutions - Goal #1

 Resolutions:  Do you find it's easy to make resolutions but difficult to keep them?  I once read an article which indicated that most resolutions, whenever they are made, don't even last a day.  Frustrating. Yet, we find ourselves making the same resolutions the next new year with the anticipation and hope for success.

So, I've stopped making resolutions.  I'm making goals.  Why goals?  Well, first they follow the rules of having them attainable, measurable, and realistic.  So, first business goal for me this year: 

POST MORE OF MY CREATIONS ON MY BLOG.  I will post at least twice a week.  This is easily measurable, just check my blog posts.  It's realistic as I'm retired and so therefore, I "should" have the time.  And it's attainable...some people blog twice a day!  

It's amazing to me how many cards, boxes, scrapbook pages, etc. I make during the year and never post them!  It's like all the Christmas cards I make and yet, don't seem to make it to the mailbox!  I can't give any reasons why this happens...but I am going post at least twice per week! I'm not going to go so far as to say what days I will post...that maybe too much to ask at this point (LOL).  But if you receive my Facebook business page posts, you should be seeing when I post something new.  Or just come to my blog address.  So, I am asking for your help.  Please leave a comment here on my blog, or post a response on my Facebook business page! This will give me a feeling of support and enthusiasm to continue posting. Thanks!  

In keeping with my goal,  below are pictures of some of the cards and projects I created and haven't posted!

Here are my two submissions for a 3 inch X 3 inch Valentine exchange:


Several crafters sign up to make 3x3 cards and swap them.  There are nine crafters in each group. so you finish with nine new ideas which you can use to create a sampler picture, use the cards on larger ones, or just save them for ideas.  It's a lot of fun and it's always amazing how none of them are ever alike!  Let me know if you're interested in participating in a swap by leaving a comment below.

Here are cards I made for a recent crop I was to attend.  (My husband and I began feeling tired with sniffles and just didn't want to spread whatever we might have to friends and family. So we stayed home for ten days.).  But I was really disappointed in not being able to go to the weekend crop.


And finally, below are pictures of a small calendar book I purchased at the Dollar Store and the finished product with some simple changes.  I think they make a great little 'sumthin' for friends.  


The top picture shows the original appearance of the front of the tiny book.  To the right of it, shows the finished book.  Below it is a picture of the back of the book.  I did not alter the spine but used the color of it to choose the Designer Paper.  I love how the lavender matches nicely. 

So, this is some of the projects I've been working in recently.  If you'd like any directions or a list of supplies I used, please comment below.

I'll be posting some birthday cards in the next few days.  I'm trying to build my stash.  Another GOAL is to mail the cards I actually make!  

Keep creating and remember you can share your creations on my Facebook business page located at:  Creating Treasures with Janice.  And if you select "Follow",  you'll receive notifications of my blog posts automatically.  

Happy New Year Resolutions  GOALS!

--  Janice